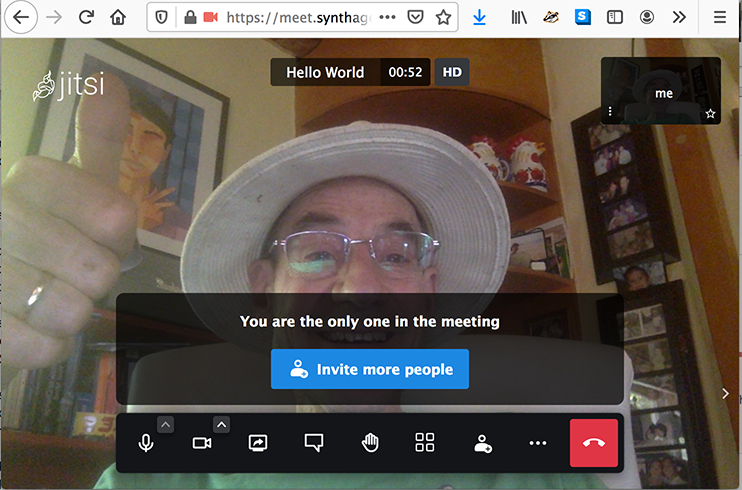
Recently Andrew and Eli Stone had a need for an Open Source, locally run video conferencing system and they came across Jitsi. We offered Ideas and Coffee for a place to host their machine with some nice backend bandwidth. Here’s their account of getting that software up and running and how that worked out for them.
Jitsi Meet – A Guide and Retrospective
– by Andrew and Eli Stone
Are you looking for a video conferencing system that is free, open source, easy to install and you can host on your own server? Then Jitsi might be the answer for you!
Jitsi is a collection of free and open-source multi-platform voice, video conferencing and instant messaging applications for the web platform, Windows, Linux, macOS, iOS and Android. The Jitsi project began with the Jitsi Desktop. Wikipedia
Andrew first learned about Jitsi from Southwest Cyberport’s and Albuquerque Linux User Group’s Jared, while “linux-weenie” Eli first heard of it while setting up Matrix. Built on top of WebRTC, it runs on any device in any web browser, with added optional clients for Android and iOS. Don’t use desktop Firefox with it, though, Firefox’s WebRTC implementation will slow down every meeting-goer’s connection. It’s no wonder the closed source competitors use electron, built on Chrome’s web engine, for their clients.
Jitsi Meet is the server, which has official prebuilt binaries for Ubuntu and Debian, as well as a docker image for other platforms. Eli, after being asked to set it up, had it up and running in less than 10 minutes. If you’re unsure about it, the Jitsi website includes a free server for testing the platform with calls of up to 8 people at https://meet.jit.si/.
You can name your “meeting room” whatever you like – they encourage 4 word random pass phrases with animated suggestions but any string of characters will do – and you can invite others to join you by sending them the room’s URL.

You’ll find the interface to be a prettier version of the familiar Zoom, with a matching set of features.

To sum up the steps to install the Jitsi Meet server:
- Grab yourself a domain from a registrar of your choice and point it to your server’s ip (curl ipinfo.me to get that). https://www.noip.com/ is an option as well if you want something free
- Add the Jitsi package repository and install it
echo 'deb https://download.jitsi.org stable/' | \sudo tee /etc/apt/sources.list.d/jitsi-stable.listwget -qO - https://download.jitsi.org/jitsi-key.gpg.key \| sudo apt-key add -sudo apt updatesudo apt install jitsi-meet nginx
Setup and configure your firewall. You will need to allow incoming traffic on tcp ports 80, 443, and 4443, and udp/tcp ports 10000-20000
Get your certificates from Let’s Encrypt .
sudo apt install python3-certbot python3-certbot-nginxsudo certbot
On an x86_64 processor, and 64 bit distribution, this should be all you need to do to get it running. Things got more interesting when we tried to install it on a tiny pine64 board’s ARM64 processor. It all seemed to work fine. We tested with a couple of clients and could get them in a call but video was not working and we weren’t sure why.
Opening the Developer console in the Firefox web browser, we could see from the console that something with Garbage Collection was broken. Grabbing the error message and searching taught us about a deprecated flag that was not recognized and caused it to bomb out. Our first fix:
editing /usr/share/jitsi-videobridge/lib/videobridge.rc
and adding this line:
VIDEOBRIDGE_GC_TYPE=G1GC
Then the video started working, that is, until we added a third client. It turns out that 2 clients just use the peer-to-peer video streaming model, but when you add the third client, the server would throw everyone out and repeat in an endless loop, reconnect, disconnect, wait, repeat. We found this in the console:
Could not initialize class org.jitsi.videobridge.sctp.SctpManager
sctp is the one hardware-dependent component of the jitsi server. Despite the jitsi packages claiming to be universal/architecture independent, and despite them mostly using architecture independent java, this single element is only compiled for x86_64. This caused quite a bit of anguish and confusion, but we were eventually able to solve it by recompiling this bit for our system thanks to the help of the guide on this page https://github.com/jitsi/jitsi-meet/issues/6449.
Before anything else, though, we purged the old jitsi program and removed the repository with the broken packages
sudo apt purge jitsi-meet
sudo rm /etc/apt/sources.list.d/jitsi-stable.list
Then it was off to the races. We downloaded the latest java 8 packages like so
sudo apt install openjdk-8-jre openjdk-8-jre-headless openjdk-8-jdk openjdk-8-jdk-headless
sudo update-alternatives --config java # selecting java 8
Then we downloaded the latest jitsi meet packages from here: https://download.jitsi.org/stable/. Although our package manager won’t keep our Jitsi up to date, it’s hopefully only a temporary patch until Jitsi starts providing ARM64 builds. The files we need are jicofo, jitsi-meet-prosody, jitsi-meet-web, jitsi-meet-web-config, and jitsi-videobridge2. We selected the latest (highest version number) deb file for each of these programs and downloaded them onto the device, installing them like so:
mkdir jitsi_debian && cd jitsi_debian
wget https://download.jitsi.org/stable/jicofo_XXXXXXXX_all.deb
# 4 more wgets like this.
sudo apt -y install *.deb
sudo systemctl stop prosody jitsi-videobridge2 jicofo
# These need to be stopped because installing these debs installs x86 libraries and they are the ones being used.
Finally, we compiled the programs that jitsi required for our architecture like so:
export JAVA_HOME=/usr/lib/jvm/java-8-openjdk-arm64
sudo apt update
sudo apt install automake autoconf build-essential libtool git maven m4
git clone https://github.com/sctplab/usrsctp.git
git clone https://github.com/jitsi/jitsi-sctp
mv ./usrsctp ./jitsi-sctp/usrsctp/
cd ./jitsi-sctp
mvn package -DbuildSctp -DbuildNativeWrapper -DdeployNewJnilib -DskipTests
cp ./jniwrapper/native/target/libjnisctp-linux-aarch64.so \
./jniwrapper/native/src/main/resources/lib/linux/libjnisctp.so
mvn package
sudo cp ./jniwrapper/native/target/jniwrapper-native-1.0-SNAPSHOT.jar \
  /usr/share/jitsi-videobridge/lib/jniwrapper-native-1.0-SNAPSHOT.jar
After all was said and done, all we had to do was start jitsi again:
sudo systemctl start prosody jitsi-videobridge2 jicofoand everything worked like a charm. Overall it was an interesting experience to setup and it definitely tested our Linux knowledge, especially our abilities to parse logs as Jitsi’s logs are not that clear or understandable. At the end of the day, we had a working system that was capable of hosting meetings of any size.
If you are interested in doing this yourself, you can get started with a virtual private server from southwest cyberport, https://www.swcp.com/vps/, a local and friendly internet provider whose help was instrumental in us being able to setup Jitsi in time. This project would not have been possible without them.


You must be logged in to post a comment.